
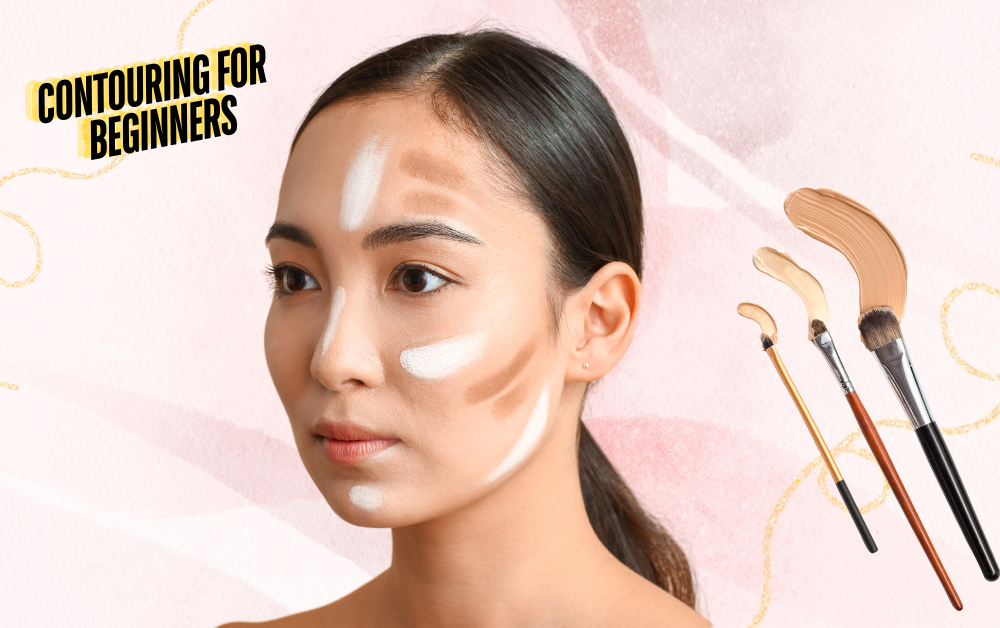
What is Contouring?
With contouring, you shape the natural contours of your face with the help of different shades of makeup. Contouring can help you achieve a more defined and chiseled appearance, whether you have a round face or a square jawline. This blog will talk about Contouring For Beginners and provide foolproof tips and tricks to untie your inner makeup artist.
The Benefits of Contouring
In addition to being a cosmetic fad, contouring is vital for enhancing your inherent beauty. One of the primary advantages of contouring is the ability to create the appearance of a more defined facial shape. If you strategically place darker hues in your cheek hollows, jawline, and nose sides, you can get higher cheekbones, a leaner face, and a more defined jawline.
You can also draw attention to your most outstanding features by contouring. Highlight the high points of your face with brighter tones, such as your cheekbones, brow bone, and nose bridge, to create a younger and more radiant appearance. It’s like being spotlighted in your own space!
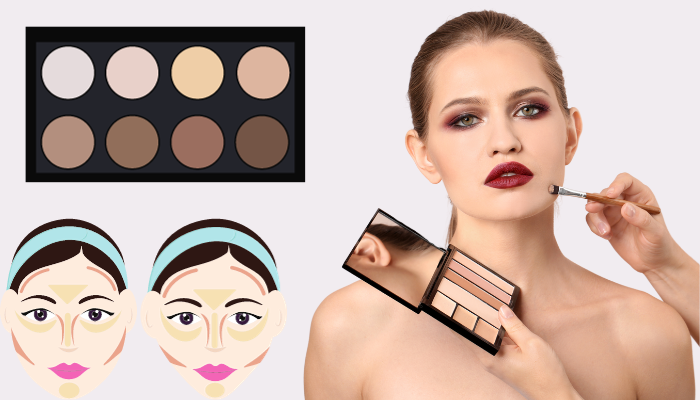
Contouring Tools and Products
As well as, You will need the right tools and products to achieve a flawless contour. The most important tool is a good quality contour brush. Look for a meeting with soft bristles and a tapered shape, allowing for precise application and blending of the contour product.
There are several contour items to choose from. Powder and cream contours are the most frequent. Powder contours are more straightforward to apply and are ideal for novices. They are also more forgiving if you make a mistake because they can be quickly blended out. In contrast, cream contours create a more dramatic and long-lasting form. They are perfect for folks with dry skin or seeking a more dramatic appearance.
Understanding Your Face Shape

Before you start contouring, you must first grasp your facial structure. Each face shape needs a unique set of contouring procedures to get the intended look. The most common facial forms are round, oval, square, heart, and diamond.
If you have a Round Face, you’ll want to create the illusion of higher cheekbones and a more minor appearance. Firstly, apply a deeper contour shade around the hollows of your cheekbones, blending them towards your hairline. Additionally, using shapes on the apples of your cheeks will only make your face look rounder.
For those with balanced proportions and an Oval Face shape, contouring becomes about adding definition and dimension along specific areas. Focus on contouring along the hairline, under the cheekbones, and along the jawline. This will contribute to enhancing the natural symmetry of your features.
Now, when it comes to a Square Face shape, the emphasis shifts to contouring along the hairline, under the cheekbones, and along the jawline. Blending well to create a flawless transition between your body and your foundation is crucial, ensuring a harmonious and polished look. You can accentuate your features by incorporating these techniques while maintaining balance and structure.
Contouring might help balance out your features if you have a Heart-shaped Face. To reduce the breadth of your brow, shape it at the temples and sides. Then, to hike definition, contour along the jawline. Blend thoroughly to obtain a natural appearance.
If you have a Diamond-shaped Face, you want to soften the angles and make it look oval. Conceal the temples, beneath the cheekbones, and around the jawline using contour. Blend thoroughly to provide a smooth transition between the shape and your foundation.
How to Choose the Right Contouring Shades
Electing the appropriate contouring shades can uplift your makeup routine, bringing about a flawless finish. The crucial aspect lies in opting for hues one or two shades darker than your skin tone.
Moreover, For those with fair skin tones, opting for contour shades that boast a grayish undertone is advisable. These particular shades meld with your foundation, imparting a natural shadow effect.
Conversely, if your skin tone leans towards the medium spectrum, gravitate towards warm-toned contour hues featuring a reddish or bronzy undertone. This choice not only imparts a natural-looking contour but also adds a touch of warmth to your complexion.
Lastly, If you have deep skin tones, choosing the right contour shades is crucial. Look for colors with a deep, rich brown undertone to improve your natural beauty. Striking a balance is important ,using shades that are too warm or too cool might make your skin look ashy or muddy.
To avoid this, opt for colors that match your undertones and blend flawlessly with your foundation. This make sure a natural and harmonious look. Transitioning into these carefully selected contour hues will make your makeup routine effortless and highlight the beauty of your deep skin tone.
How to Contour and Highlight For Beginners
Now that you have all the necessary information let’s dive into a step-by-step guide to contouring for beginners:
Step 1: Firstly, Start with a clean and moisturized face. Apply your foundation as usual and set it with a translucent powder.
Step 2: Determine your face shape and choose the appropriate contouring technique.
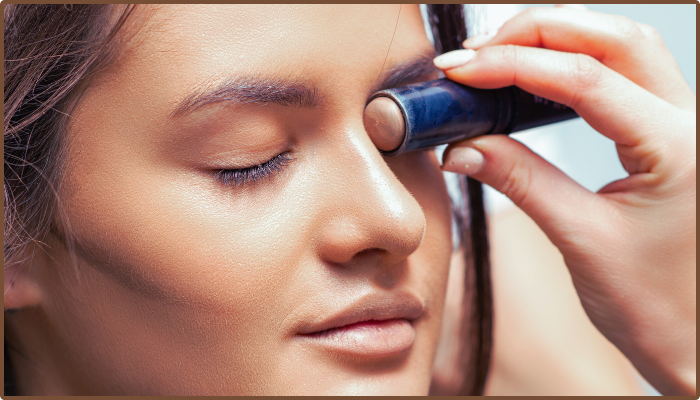
Step 3: Using a contour brush, apply the contour shade to the areas you want to define or slim down. Remember to start with a light hand and build up the intensity gradually.
Step 4: Blend the contour shade using a clean brush or a damp beauty sponge. Use circular motions to blend the product flawlesslyinto your foundation.
Step 5: Apply a highlight shade to the high points of your face, such as your cheekbones, brow bone, and the bridge of your nose. Blend well to create a natural-looking glow.
Step 6: Set your contour and highlight with a translucent powder to making sure long-lasting wear.
Step 7: Complete your makeup look with blush, bronzer, and a touch of highlighter for a radiant finish.
Highlighting Techniques
Highlighting serves as the counterpart to contouring, effectively bringing attention to specific areas of your face. In the pursuit of a harmonious look, it is crucial to strike a balance between contour and highlight. Moreover, discover the art of highlighting key areas such as the tops of your cheekbones, the bridge of your nose, and your cupid’s bow. This technique contributes to a radiant and youthful appearance, flawlessly complementing the contours created.
By incorporating highlighting strategically, you achieve a well-balanced and polished makeup finish, ensuring that both contour and highlight work in tandem to uplift your facial features.
Common Mistakes (Contouring For Beginners)
Contouring can be a game-changer when done correctly, but it’s easy to make mistakes, especially if you’re a beginner. Avoid these common mistakes:
Mistake 1: Going too heavy with the contour product. Remember, less is more. Gradually increase the intensity by starting with a light hand.
Mistake 2: Using the wrong shade of contour. Choose a shade one to two shades darker than your natural skin tone. Avoid going too dark or light, which can create an unnatural look.
Mistake 3: Remember to blend. Blending is the key to achieving a natural and flawless contour. Take time to integrate the product into your foundation for a flawless finish.
Mistake 4: While some people apply contour in the wrong places. Understanding your face shape and contouring accordingly is essential. Applying contour in the wrong places can create an unbalanced and unnatural look.
Mistake 5: Remember to set your contour and highlight. Setting your shape and highlight with a translucent powder will make sure they last all day and look flawless.
Tips And Tricks For Flawless Contouring For Beginners
Here are some ideas and strategies for excellent contouring results to take your talents to the next level:
Tip 1: Firstly, Contour with a matte bronzer. As contour hues, shimmery bronzers might appear overly harsh and unnatural.
Tip 2: Use contour in natural light. Natural light will let you see how your shape will appear and create a smoother blend.
Tip 3: Combine your contour with a clean brush or beauty sponge. Using the same foundation brush as you did for your foundation might result in a muddy and uneven shape.
Tip 4: Use a translucent powder to set your contour and highlight. This will make sure that they look and last all day.
Tip 5: Practice, practice, practice! Mastering contouring takes time. Keep going even if your first attempts could be better. You will improve over time if you keep practicing.
Recommended Contouring Products
Furthermore, If you’re new to contouring and unsure which products to invest in, here are some recommendations for best contour stick for beginners and best contour kit for beginners.
Anastacia Beverly Hills Contour Kit:
This palette contains six blendable shades that cater to different skin tones and provide a natural-looking contour.
Fenty Beauty Match Stix Trio:
This trio contains two matte contour shades and a shimmer highlighter. Its cream formula is easy to blend and perfect for beginners.
NYX Professional Makeup Wonder Stick:
The creamy formula blends flawlessly and is ideal for beginners. This dual-ended contour stick is perfect for touch-ups on the go.
Benefit Cosmetics Hoola Matte Bronzer:
It is a cult-favorite bronzer perfect for contouring, with a matte formula that suits a wide range of skin tones.
Maybelline Fit Me Matte + Poreless Foundation:
In last, Foundations like this one are affordable and offer a wide range of shades. They provide a smooth base for contouring and are ideal for beginning users.
How To Contour And Highlight For Beginners
Above All, Getting that celebrity-inspired contour and highlight look can be a breeze, even for beginners. Start by analyzing popular celebrity makeup styles — those flawless looks that catch your eye. Now, here’s the exciting part: draw inspiration from these styles to recreate the glamour for yourself.
in fact, To make things easy, consider some practical tips for beginners.
Moreover, Transition into the world of celebrity-inspired makeup by embracing a few simple techniques. Begin by observing the contours and highlights that uplift the stars’ features. Moreover, break down the process step by step, making it accessible and enjoyable for those just starting their makeup journey.
So, start your beauty experience with confidence, learning from the greatest in the celebrity world. After all, creating that red-carpet glow is easier than you would think, especially with the appropriate advice and a dash of star-inspired magic.
Conclusion:
On the whole, Contouring is a makeup technique that can uplift your natural beauty and transform your look. However, Anyone can achieve a flawless and professional contour with the right tools, products, and procedures. Remember to choose the right shades for your skin tone, understand your face shape, and practice to perfect your skills. So go ahead, unseal your inner makeup artist, and embrace the power of contouring!
In last, Ready to unseal your inner makeup artist? Start practicing your contouring skills today and embrace the transformative power of makeup!

Pingback: How to choose contour shade?- Life and Style